


Views: 222 Author: Rebecca Publish Time: 2025-04-04 Origin: Site


Content Menu
● Introduction to PID Controllers
>> Why Use a PID for Electric Kettles?
● How Does a PID Work in an Electric Kettle Setup?
>> Step 2: Mounting Components
>> Step 4: Configuring Your PID Controller
>> Step 5: Auto-Tuning Your System
● Advanced Tips for Optimizing Your PID Setup
>> Using an External Thermometer
● Applications of a PID-Controlled Electric Kettle
● FAQs
>> 1. What is auto-tuning in a PID controller?
>> 2. Can I use manual mode on my boil kettle PID?
>> 3. How do I calibrate my RTD probe?
>> 4. Why is a heat sink necessary for SSRs?
>> 5. What are common problems when tuning PID controllers?
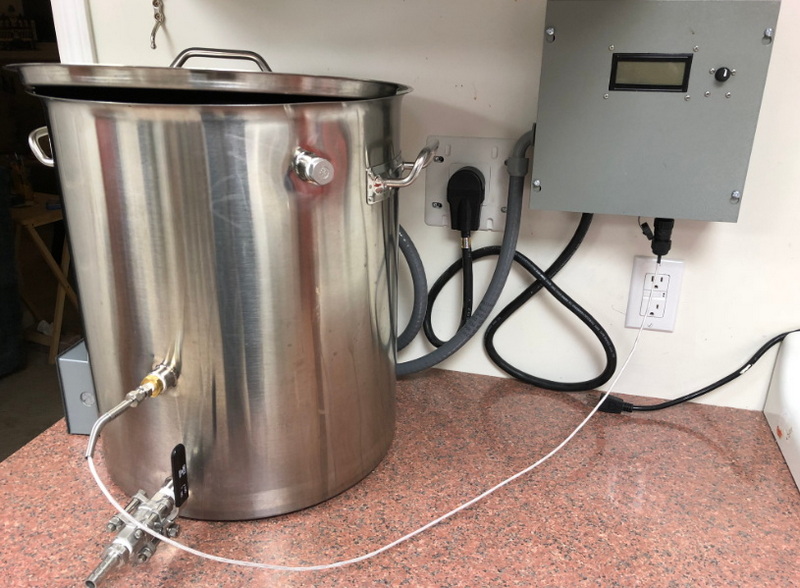
A PID (Proportional-Integral-Derivative) controller is a powerful device that allows precise temperature control, making it an excellent addition to an electric boil kettle. Whether you're a coffee enthusiast, a tea aficionado, or a homebrewer, setting up a PID can help you achieve consistent results by maintaining stable and accurate temperatures. This guide will provide detailed instructions on how to set up a PID for your electric boil kettle, from gathering components to troubleshooting common issues.

A PID controller is an advanced feedback control mechanism that continuously adjusts the output of a system to maintain a desired setpoint. It operates using three components:
1. Proportional (P): Reacts to the current error between the setpoint and the actual temperature.
2. Integral (I): Accounts for accumulated past errors to eliminate steady-state discrepancies.
3. Derivative (D): Predicts future errors based on the rate of change in temperature.
When combined, these three elements enable precise control over processes like heating water in an electric kettle.
Electric kettles are typically designed to boil water without offering precise temperature control. However, many applications—such as brewing coffee, preparing tea, or managing mash temperatures in homebrewing—require specific temperature ranges. A PID controller ensures that your kettle maintains these temperatures with minimal fluctuation, making it perfect for tasks that demand accuracy.
Before starting the setup process, ensure you have the following components:
1. PID Controller: Choose one with relay output and auto-tune functionality.
2. Temperature Sensor: An RTD probe like PT100 is recommended for its high accuracy and reliability.
3. Solid State Relay (SSR): A 15-amp SSR is sufficient for most setups.
4. Heat Sink: Prevents overheating of the SSR during operation.
5. Project Box: Houses all components securely and protects them from external damage.
6. Power Cord and Switch: For safe power management and easy operation.
7. Electrical Socket: Connects the kettle to your system.
8. Wiring Tools: Includes wires, connectors, and basic electrical tools like screwdrivers and pliers.
A PID controller monitors the temperature of the water via the RTD probe and adjusts the power supplied to the heating element through the SSR. This feedback loop ensures that the water reaches and stays at the desired temperature without overshooting or fluctuating excessively.
For example:
- If the water is cooler than the target temperature, the PID increases power to heat it up.
- If it's hotter than desired, the PID reduces power or turns off heating entirely.
This continuous adjustment makes PIDs ideal for applications requiring stable temperature control.
Before assembling your system, sketch out a wiring diagram to visualize how each component will connect. This step helps avoid confusion during installation and ensures safety.
1. Securely mount the PID controller inside your project box.
2. Attach the SSR to its heat sink and mount it inside the box as well.
3. Drill holes in the box for ventilation and cable routing.
4. Position your RTD probe so it can accurately measure water temperature inside your kettle.
Wiring is critical for both functionality and safety:
1. Connect your power cord to supply electricity to the system.
2. Wire the SSR output terminals to control the kettle's heating element.
3. Attach your RTD probe wires to the designated input terminals on the PID controller.
4. Ensure all ground connections are securely fastened inside the box.
Double-check all connections before proceeding to avoid electrical hazards or malfunctions.
Once wired, configure your PID controller settings:
1. Enter programming mode by holding down the "SET" button on your controller for three seconds.
2. Adjust key parameters:
- Proportional Constant (P): Start with 40; this value controls how aggressively the system reacts to errors.
- Integral Time (I): Set to 350 seconds; this eliminates steady-state errors over time.
- Derivative Time (D): Set to 2 seconds; this helps predict future errors based on rate changes.
- Cycle Time: Set to 2 seconds for compatibility with SSRs.
These values may require adjustment depending on your specific kettle and heating element.
Auto-tuning enables your PID controller to learn how your kettle heats water and adjust its internal parameters accordingly:
1. Fill your kettle with water and set a target temperature (e.g., 154°F).
2. Enable auto-tuning by setting "At" to 2 in programming mode.
3. Wait for auto-tuning to complete; this typically takes 20–40 minutes.
During this process, avoid disturbing the system or changing settings.
Once auto-tuning is complete:
1. Test manual mode by adjusting heating output percentages (e.g., setting it to 100% for boiling).
2. Switch back to automatic mode and verify that your kettle maintains target temperatures accurately.
If you notice overshooting or oscillation around your target temperature:
- Reduce proportional gain (P) if overshooting occurs frequently.
- Increase integral time (I) if steady-state errors persist.
- Minimize derivative gain (D) unless rapid changes in temperature are common.
Adding insulation around your kettle can reduce heat loss and improve efficiency, allowing your PID system to maintain temperatures more effectively.
Periodically compare readings from your RTD probe with an external thermometer to ensure accuracy and recalibrate if necessary.
A PID-controlled electric kettle isn't just for boiling water—it opens up a world of possibilities:
1. Coffee Brewing: Achieve precise temperatures for pour-over or French press coffee.
2. Tea Preparation: Brew delicate teas like green or white tea at their ideal temperatures without scorching them.
3. Homebrewing: Maintain mash temperatures during beer brewing with consistency, ensuring better flavor extraction.
4. Sous Vide Cooking: Use your kettle as part of a sous vide setup for cooking meats and vegetables at controlled temperatures over long periods.
Working with electricity requires caution:
- Always unplug your setup before making adjustments or repairs.
- Use insulated tools when handling live wires.
- Ensure all connections are secure and insulated properly.
- Test your system thoroughly before regular use.
Setting up a PID controller for an electric boil kettle is an excellent way to achieve precise temperature control for various applications, from brewing coffee to homebrewing beer or even sous vide cooking. By following this guide step-by-step, you can transform an ordinary electric kettle into a versatile tool that delivers consistent results every time.
With proper tuning and maintenance, your new setup will provide reliable performance while enhancing your ability to experiment with different recipes and techniques.
Auto-tuning allows the PID controller to automatically adjust its P, I, and D values based on system behavior during heating cycles. It ensures optimal performance without requiring manual tuning expertise.
Yes! Manual mode lets you control heating output by percentage rather than temperature, which is useful for maintaining rolling boils without boil overs during cooking or brewing processes.
Submerge both your RTD probe and a reliable thermometer in hot water at a known temperature (e.g., boiling point). Compare readings and adjust Pb settings on your PID controller until they match closely.
Solid State Relays generate heat when switching power rapidly; attaching them to a heat sink dissipates this heat effectively, preventing damage or overheating during operation.
Common issues include:
- Instability caused by excessive gain values.
- Slow response due to low gain settings.
- Overshooting from excessive integral or derivative gain values.
- Steady-state errors from insufficient integral action.


